- Introduct
- JSON Web Token (JWT):
 What is a JSON Web Token?
A JSON Web Token, or JWT,
is used to send information that can be verified and trusted by means
of a digital signature. It comprises a compact and URL-safe JSON object,
which is cryptographically signed to verify its authenticity, and which
can also be encrypted if the payload contains sensitive information.Because of it’s compact structure, JWT is usually used in HTTP
Authorization headers or URL query parameters.Structure of a JSON Web Token
A JWT is represented as a sequence of base64url encoded values that are separated by period characters.

JSON Web Token example:
eyJhbGciOiJIUzI1NiIsInR5cCI6IkpXVCJ9.
eyJpc3MiOiJ0b3B0YWwuY29tIiwiZXhwIjoxNDI2NDIwODAwLCJodHRwOi8vdG9wdGFsLmNvbS9qd3RfY2xhaW1zL2lzX2FkbWluIjp0cnVlLCJjb21wYW55IjoiVG9wdGFsIiwiYXdlc29tZSI6dHJ1ZX0.
yRQYnWzskCZUxPwaQupWkiUzKELZ49eM7oWxAQK_ZXwHeader
The header contains the metadata for the token and it minimally contains the type of signature and the encryption algorithm. {
“alg”: “HS256”,
“typ”: “JWT”
}
Once this is base64 encoded, we have the first part of our JWT.
eyJhbGciOiJIUzI1NiIsInR5cCI6IkpXVCJ9Payload (Claims)
In the context of JWT, a claim can be defined as a statement about an entity (typically, the user), as well as additional meta data about the token itself. The claim contains the information we want to transmit, and that the server can use to properly handle authentication. There are multiple claims we can provide; these include registered claim names, public claim names and private claim names.Registered Claims
These are the claims that are registered in the IANA JSON Web Token Claims registry. These claims are not intended to be mandatory but rather to provide a starting point for a set of useful, interoperable claims.
These include:
- iss: The issuer of the token
- sub: The subject of the token
- aud: The audience of the token
- exp: Token expiration time defined in Unix time
- nbf: “Not before” time that identifies the time before which the JWT must not be accepted for processing
- iat: “Issued at” time, in Unix time, at which the token was issued
- jti: JWT ID claim provides a unique identifier for the JWT
Public claims need to have collision-resistant names. By making the name a URI or URN naming collisions are avoided for JWTs where the sender and receiver are not part of a closed network.
An example of a public claim name could be:
https://www.toptal.com/jwt_claims/is_admin,
and the best practice is to place a file at that location describing
the claim so that it can be dereferenced for documentation.Private Claims
Private claim-names may be used in places where JWTs are only exchanged in a closed environment between known systems, such as inside an enterprise. These are claims that we can define ourselves, like user IDs, user roles, or any other information.
Using claim-names that might have conflicting semantic meanings outside of a closed or private system are subject to collision, so use them with caution.
It is important to note that we want to keep a web token as small as possible, so use only necessary data inside public and private claims.
Example Payload
{
  “iss”: “toptal.com”,
  “exp”: 1426420800,
  “https://www.toptal.com/jwt_claims/is_admin”: true,
  “company”: “Toptal”,
  “awesome”: true
}
eyJpc3MiOiJ0b3B0YWwuY29tIiwiZXhwIjoxNDI2NDIwODAwLCJodHRwOi8vdG9wdGFsLmNvbS9qd3RfY2xhaW1zL2lzX2FkbWluIjp0cnVlLCJjb21wYW55IjoiVG9wdGFsIiwiYXdlc29tZSI6dHJ1ZX0 Signature
The JWT standard follows the JSON Web Signature (JWS) specification to generate the final signed token. It is generated by combining the encoded JWT Header and the encoded JWT Payload, and signing it using a strong encryption algorithm, such as HMAC SHA-256. The signature’s secret key is held by the server so it will be able to verify existing tokens and sign new ones.$encodedContent = base64UrlEncode(header) + “.” + base64UrlEncode(payload);
$signature = hashHmacSHA256($encodedContent);
yRQYnWzskCZUxPwaQupWkiUzKELZ49eM7oWxAQK_ZXwSecurity and Encryption with JWT
It is critical to use TLS/SSL in conjunction with JWT, to prevent man-in-the-middle attacks. In most cases, this will be sufficient to encrypt the JWT payload if it contains sensitive information. However, if we want to add an additional layer of protection, we can encrypt the JWT payload itself using the JSON Web Encryption (JWE) specification.Of course, if we want to avoid the additional overhead of using JWE, another option is to simply keep sensitive information in our database, and use our token for additional API calls to the server whenever we need to access sensitive data.
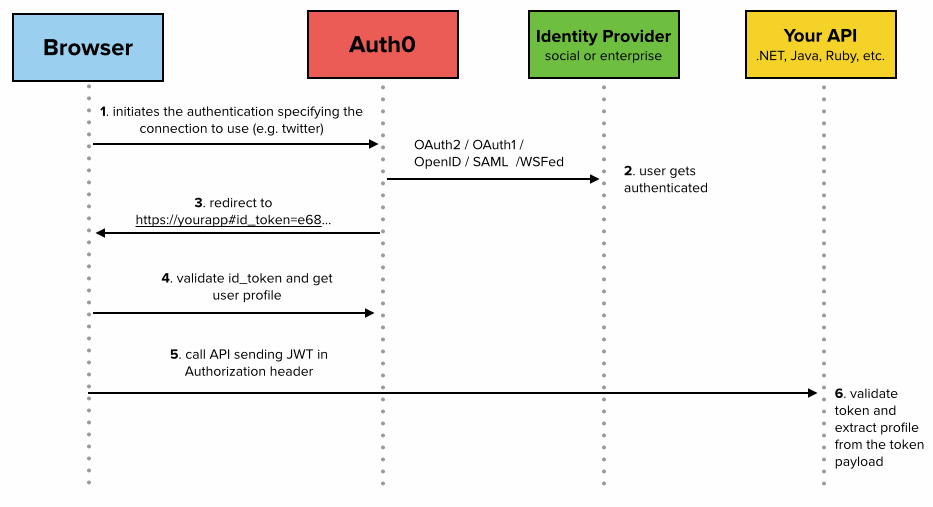
Why the need for Web Tokens?
Before we can see all the benefits of using token authentication, we have to look at the way authentication has been done in the past.Server-Based Authentication
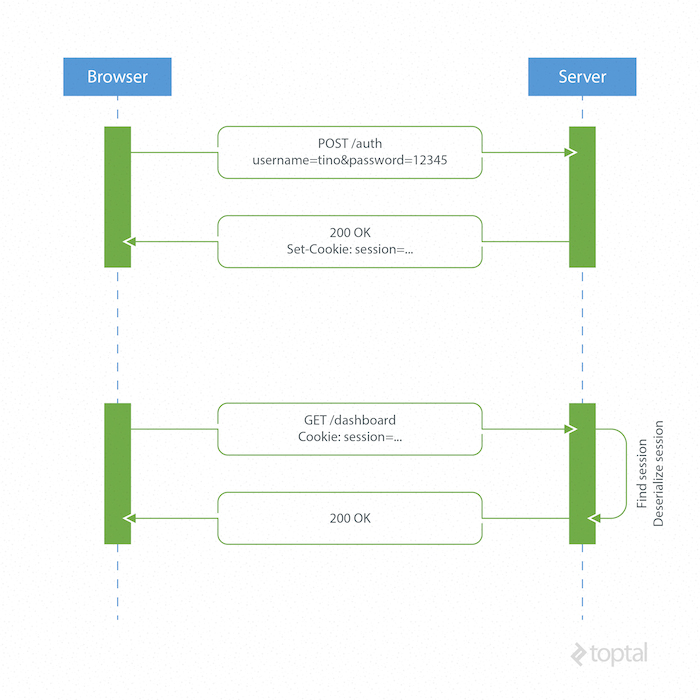
Because the HTTP protocol is stateless, there needs to be a mechanism for storing user information and a way to authenticate the user on every subsequent request after login. Most websites use cookies for storing user’s session ID.
How it Works
The browser makes a POST request to the server that contains the user’s identification and password. The server responds with a cookie, which is set on the user’s browser, and includes a session ID to identify the user.
On every subsequent request, the server needs to find that session and deserialize it, because user data is stored on the server.
- Instruction
- Example
- Finish
No comments:
Post a Comment